GCP Deployment Guide
This feature is only available for select Business Critical customers. You can't set up your own Dedicated Space without the assistance of Upbound. If you're interested in this deployment mode, please contact us.
A Dedicated Space deployed on GCP is a single-tenant deployment of a control plane space in your GCP organization in an isolated project. With Dedicated Spaces, you can use the same API, CLI, and Console that Upbound offers, with the benefit of running entirely in a cloud account that you own and Upbound manages for you.
The following guide walks you through setting up a Dedicated Space in your GCP organization. If you have any questions while working through this guide, contact your Upbound Account Representative for help.
Dedicated Space on GCP architecture
A Dedicated Space is a deployment of the Upbound Spaces software inside an Upbound-controlled project in your GCP cloud environment. The Spaces software runs in this project, orchestrated by Kubernetes. Backups and billing data get stored inside bucket or blob storage in the same project. The control planes deployed and controlled by the Spaces software runs on the Kubernetes cluster which gets deployed into the project.
The diagram below illustrates the high-level architecture of Upbound Dedicated Spaces:
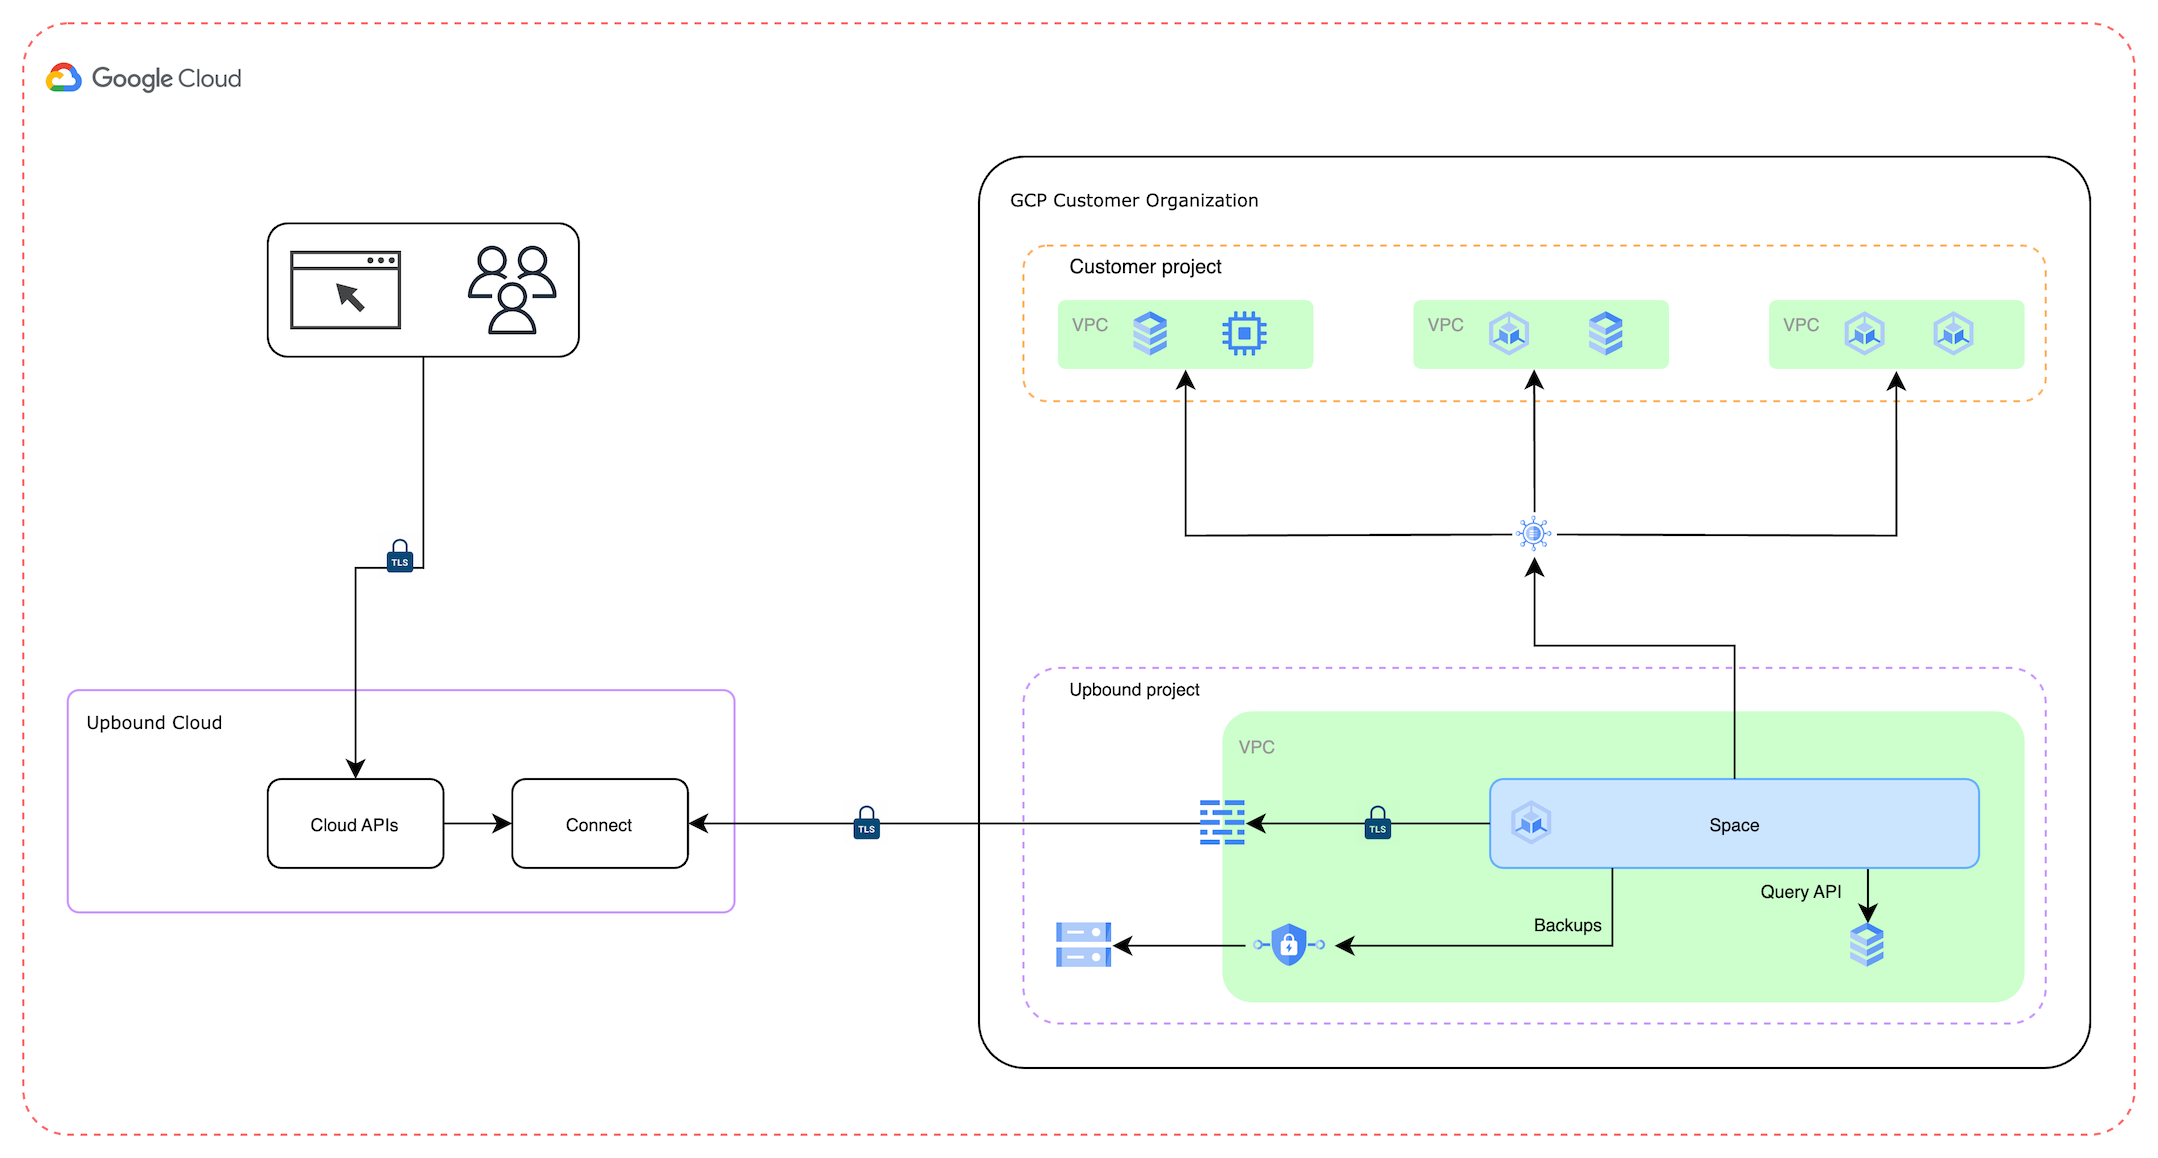
The Spaces software gets deployed on a GKE Cluster in the region of your choice. This GKE cluster is where your control planes are ultimately run. Upbound also deploys cloud buckets, 1 for the collection of the billing data and 1 for control plane backups.
Upbound doesn't have access to other projects nor your organization-level settings in your cloud environment. Outside of your cloud organization, Upbound runs the Upbound Console, which includes the Upbound API and web application, including the dashboard you see at console.upbound.io. By default, all connections are encrypted, but public. Optionally, you also have the option to use private network connectivity through GCP Private Service Connect.
Prerequisites
- An organization created on Upbound
- You should have a preexisting GCP organization with an active Cloud Billing account to complete this guide.
- You must create a new GCP project. Read the GCP documentation to learn how to create a new project in an existing organization on GCP.
After the project information gets provided to Upbound, don't change it any further. Any changes made to the project or the resources created by Upbound for the purposes of the Dedicated Space deployments voids the SLA you have with Upbound. If you want to make configuration changes, contact your Upbound Solutions Architect.
Enable APIs
Enable the following APIs in the new project:
- Kubernetes Engine API
- Cloud Resource Manager API
- Compute Engine API
- Cloud DNS API
Read how to enable APIs in a GCP project here.
Create a service account
Create a service account in the new project. Name the service account, upbound-sa. Give the service account the following roles:
- Compute Admin
- Project IAM Admin
- Service Account Admin
- DNS Administrator
- Editor
Select the service account you just created. Select keys. Add a new key and select JSON. The key gets downloaded to your machine. Save this for later.
Create a DNS Zone
Create a DNS Zone, set the Zone type to Public.
Configure Private Service Connect
By default, all connections to the Upbound Console are encrypted, but public. GCP Private Service Connect is a feature that allows VPC peering whereby your traffic doesn't traverse the public internet. To have this configured, contact your Upbound Account Representative.
Provide information to Upbound
Once these policies get attached to the key, tell your Upbound Account Representative, providing them the following:
- The service account JSON key
- The NS records associated with the DNS name created in the last step.
- the name of the organization that you created in Upbound. Use the up CLI command,
up org list, so see this information. - Confirmation of which region in GCP you want the deployment to target.
Once Upbound has this information, the request gets processed in a business day.
Use your Dedicated Space
Once the Dedicated Space gets deployed, you can see it in the Space selector when browsing your environment on console.upbound.io.